PREPPING YOUR ANIMATED SCREENS

After you download your animations from our site follow these steps to prep your animations to be used on your device.

  • Browse to your downloads folder and locate your file. We usually start the template name with PBG- or MT-.
  • Do a right click on the .zip folder and go to “Extract All”.  A new folder should pop up with your animation video files.
  • When you are in the folder you will see two text documents one will say help.txt. Contact us if you need any help.
  • Most (If not all) PC/iPad softwares will use the .mp4 version of the animations. Fotomaster v1-v8 will use .SWF files.
  • Your software may require a Codec: Download Codec KL

If you run into issues send an email Including the following: File names, software, and what your issue is. Email the file to design@photoboothgraphics.com.

Some softwares require a smaller file size then we render out as. Here is a good website to compress the files. https://www.mp4compress.com/

How to instructions to add your videos to your computer or device.

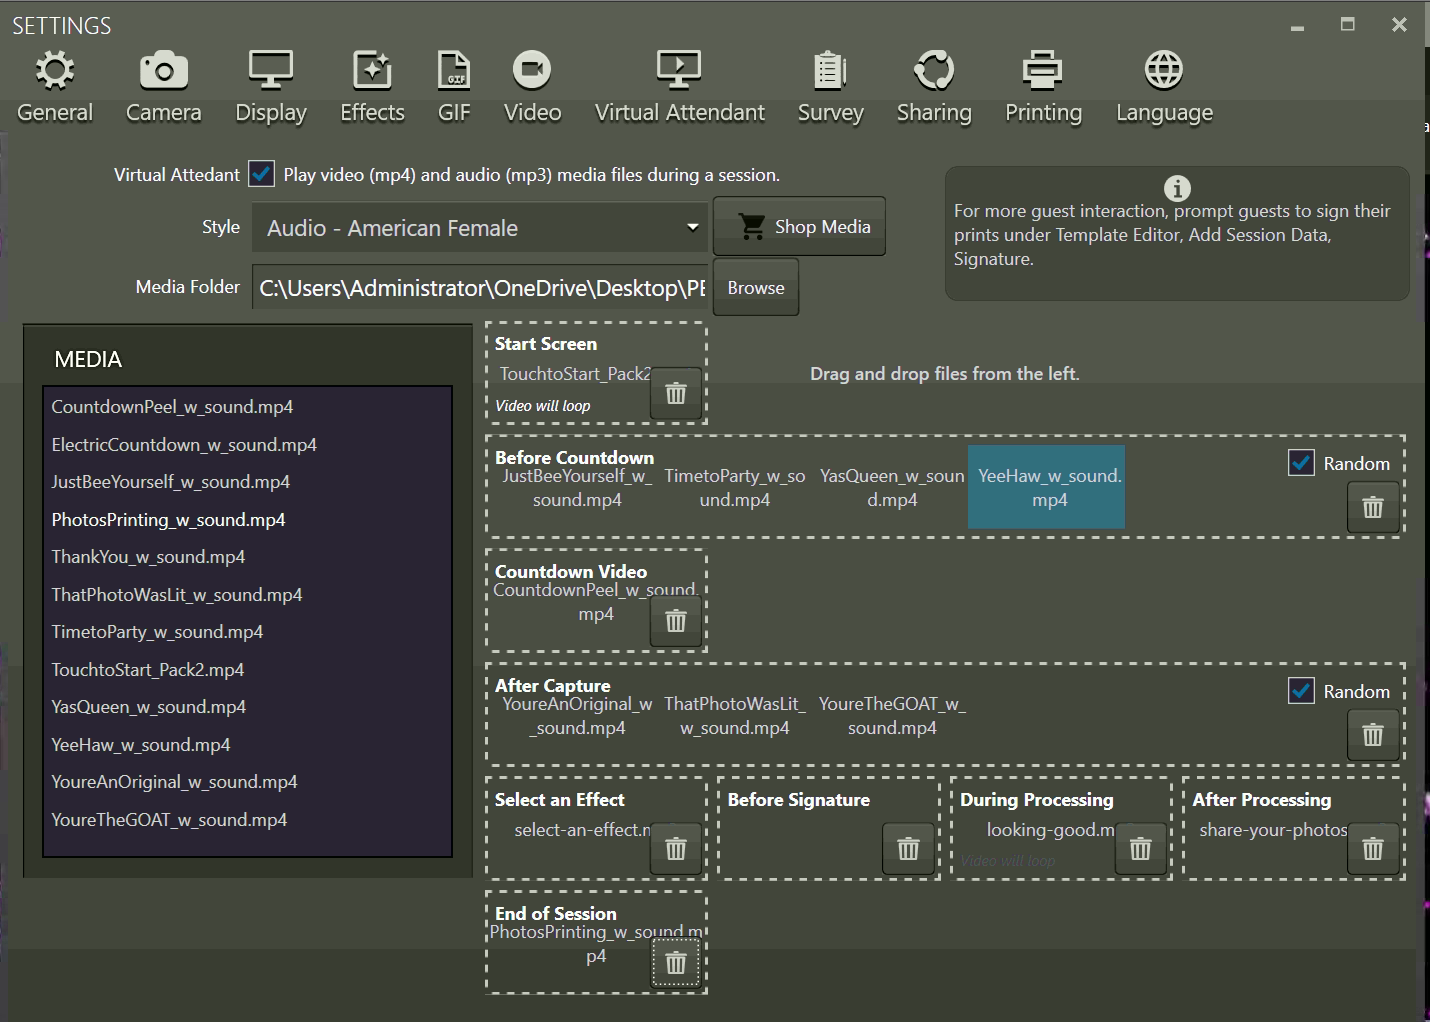
BOOTH ANIMATIONS – DARKROOM

Follow the link below for instructions on how to use our videos in your Darkroom Mirror Booth.

Be sure to use the .mp4 from the product folder.

http://www.darkroomsoftware.com/how-to/create-a-mirror-photo-booth-with-darkroom-booth/


How to add an attract screen to Darkroom Booth

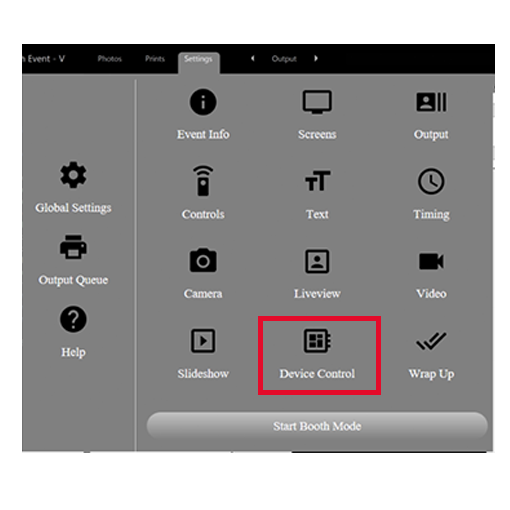
Select Device Control

From the menu at top in Darkroom drop down and left click on “device control.
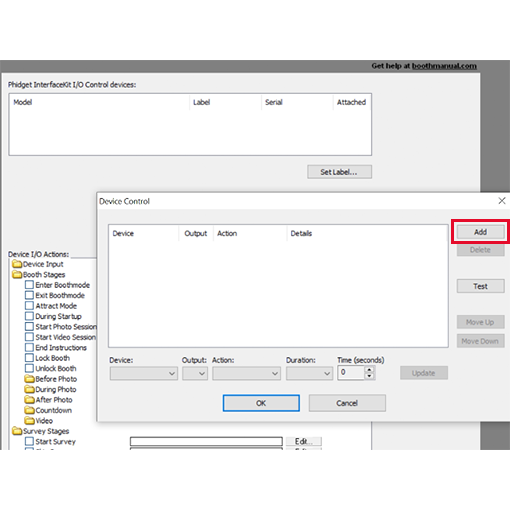
 

Adding the Video

Once you click edit on “Attract Mode” you will find the button “Add” from there click on “Video

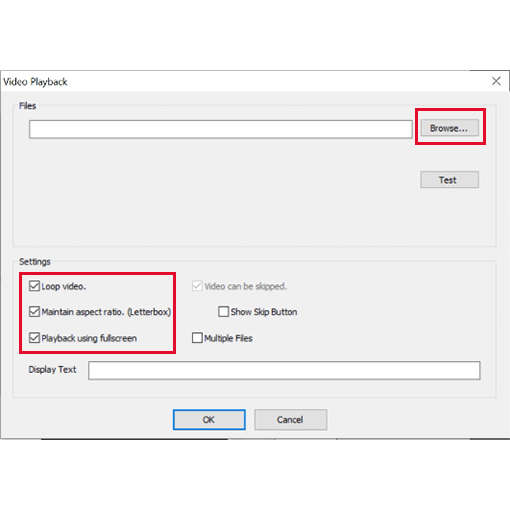
Uploading the MP4 video

1. Check the three (3) boxes on the left. Loop Video, Maintain aspect ratio, and playback using fullscreen.
2. Click on browse and find your mp4 file. (Hint: Make sure to unzip your .zip file you downloaded from our site or that we sent you as a custom item.

How to add an attract screen to a “Traditional” (Non Mirror) Booth

The process is almost the same as setting up a mirror in device control. The difference is turning everything else off other then the “Attract mode” video section. You’ll only have the “Attract mode” checked. Nothing else. 

MIRROR BOOTH ANIMATIONS – FOTOMASTER

Follow this link to a tutorial: https://fotomasterltd.zendesk.com/hc/en-us/articles/360051609233-Foto-Master-Photo-Booth-V11-Software-Video-Tutorial

*note- Any .swf video screen files purchased after 10-15-18 will need to be set to “event trigger” in the workflow. See Below
*Note- V9 now accepts .mp4 files. 

———————————————————————————————————————–

BOOTH ANIMATIONS – DSLRBOOTH

Using the Virtual Attendant:

To access the virtual attendant click on Settings -> Virtual Attendant and check the box at the top.

Click the Style drop down and choose which audio you would like to use, Video – Mirror Booth or Custom.

The audio options will give audio cues to guests in the photo booth. Video – Mirror Booth includes horizontal animations that create an interactive experience for the user. 

The Custom function allows you to upload your own animations or ones that you have purchased from our site or other sites. Change the style to Custom then click on the Browse button. Choose the folder that has the animations. They will then upload on the left side of the virtual attendant screen. 

Drag and drop the animations to the different locations (start screen, before capture, after capture, etc). Then click Save.

Follow this link to a tutorial: https://support.dslrbooth.com/hc/en-us/articles/115000603854-Virtual-Attendant

View their how to video: https://youtu.be/dS5UyT82Rxs

Here is an example setup with the All The Essentials Pack 2 (purchase here)

———————————————————————————————————————–

BREEZE SOFTWARE – VIDEOS

Movie files can be displayed on the screens by placing a movie file in MP4 or QuickTime MOV format in the photo booth images folder and giving it the same name as the screen image. For example, to play an MP4 movie file when the ready.jpg screen is displayed the movie file should be named ready.mp4. Movie files can’t overlap the live view display and so if live view is active the movie will be displayed in the area below the live view.

Append “_loop” to the filename , e.g. ready_loop.mp4, if you want the movie to automatically restart from the beginning and play continuously.

By default movie files are displayed centered on the screen unless live view is active in which case they are displayed below the live view. Movie files can also be positioned manually by appending the offsets from the left and top of the screen to the filename in the form _{LeftOffset}+{TopOffset} e.g. to position the ready.mp4 movie 200 pixels from the left of the screen and 100 pixels from the top the file should be named ready_200+100.mp4 (or ready_loop_200+100.mp4 if you want it to play continuously). If the movie is larger than the screen it will be automatically scaled to fit the screen.

When a movie is displayed on the countdown screen (e.g. by naming it 1.mp4) it replaces the normal countdown text and is only played once. Approximately 1 second before the end of the movie the taking.jpg screen is displayed and then the photo is taken when the movie reaches the end. There is a sample movie file called countdown.mp4 in the folder where DSLR Remote Pro is installed. To use this simply copy it to your photo booth images folder and rename it to 1.mp4, 2.mp4 etc.
Important: The delay before taking each photo must be set to 2 secs or more otherwise the countdown movie will not be displayed.

https://breezesys.com/DSLRRemotePro/help/index.html?photobooth_setup.htm

Please note: If an animated GIF has been defined for the countdown the countdown movie file will be ignored.

 
  • Need us to Edit the Animation for you?

     
    $10 – $25
    Logo Drop/Text Change* – $15* 
    Handwritten Animation – $25
    Must have purchased one of our templates.